Product Photography Editing for Mattress Brands
67% of consumers consider image quality very important when buying online, while 42% of shoppers try to judge a product's size from its images, according to the evidence summarized by PixelPanda. For mattress brands, product photography editing isn't just about making a bed look attractive. It determines whether shoppers can read the ticking, judge the quilt's loft, and understand what will arrive at their door.
A showroom associate can explain a gusset or point out the difference between floor models. Your product images need to provide that clarity online, without making an ordinary cover look luxurious through invented texture or making a mattress appear deeper than it is. Accuracy beats polish whenever the two compete.
Product Photography Editing Workflow for Mattresses
Start with the physical product, not an editor's preferred look. Approve the mattress sample, identify its colorway and construction, and keep a reference image that nobody retouches.
Commercial editing has a long production history. The New York Times retrospective on Photoshop records its first release on February 19, 1990, at $895. The useful lesson isn't nostalgia. Editing should be a repeatable production process, not a series of undocumented aesthetic decisions.
Editing stages, targets and pass checks
Use this order so a late color correction doesn't force you to rebuild masks, shadows, and exports.
Stage | Mattress-specific target | Pass check |
|---|---|---|
Capture and reference | Gray or color target visible in the reference frame | Target provides a neutral reference before creative edits |
Raw profile and white balance | Ivory fabric stays ivory, not blue-gray | Fabric swatch matches the physical sample under standard light |
Lens and perspective | Bed edges and foundation sit level across the set | Base lines are straight at the crop |
Cleanup on separate layers | Dust, backdrop seams, and packaging wrinkles removed without touching construction | Quilting and stitching remain visible at full-resolution inspection |
Background removal | Clean white or light-neutral background | No halos along the base or bed edge |
Contact shadow | Natural shadow beneath the bed matching the light direction | Shadow edge is soft and consistent across the set |
Texture and tonal pass | Restrained highlights, shadows, and contrast | Dark covers retain shadow detail |
Master export | High-bit-depth master with layered source kept | Master approved before any derivative is made |
Channel derivatives | Crops and sizes matched to each channel | Each file matches the approved master |
Apply corrections without losing product evidence
Capture a neutral target. Photograph it under the same lighting as the mattress, then remove it for the selling frames. It provides a defensible reference when someone later asks whether the ivory ticking should look warmer. Set up that reference before shooting, using these practical principles for taking good product shots.
Set the raw profile and white balance before local retouching. Adobe's product photography guidance identifies white-balance correction and color-cast removal as important because lighting changes apparent product color. Don't neutralize an intentionally warm fabric until it turns blue-gray.
Correct geometry before building the cutout. Straighten the foundation and correct lens distortion, then compare the near and far edges. Perspective correction should remove camera-induced distortion, not stretch the mattress into a more impressive silhouette.
Keep cleanup reversible. Put dust removal, backdrop repairs, and packaging-crease cleanup on separate layers. A seam in the background can go; a seam joining the gusset to the sleeping surface cannot. Don't clone away handles because they interrupt an otherwise clean side panel.
Build the contact shadow before the final tonal pass. Match its direction to the captured light and preserve the point where the bed meets the floor. Then adjust contrast selectively. Over-sharpened quilting looks brittle, while crushed shadows make charcoal covers lose their stitch definition.
Validate representative fabric regions against approved physical samples under standardized light. A calibrated display helps, but an uncalibrated monitor alone isn't an approval standard. Check the quilt, side panel, piping, and gusset independently rather than assuming one correct area proves the whole mattress is right.
Approve the master before exporting derivatives. Retain the layered source and a high-bit-depth working master. Generate retailer, website, and campaign files from that approved version, rather than repeatedly opening and saving compressed delivery files.
Practical rule: At full-resolution inspection, could a buyer still count the quilting rows and distinguish stitching from sharpened noise? If not, the texture pass needs work.
Acceptable Edits and Lines Not to Cross
The most polished image isn't automatically the best selling image. When retouching removes the evidence shoppers use to judge quality, it can undermine confidence instead of strengthening it.
Baymard's survey of 2,273 U.S. online shoppers in June 2026 found that 60% would feel less confident purchasing when they knew product imagery was AI-generated, according to PetaPixel's coverage. That's a reason to treat AI as a trust decision, not a cheaper production method.
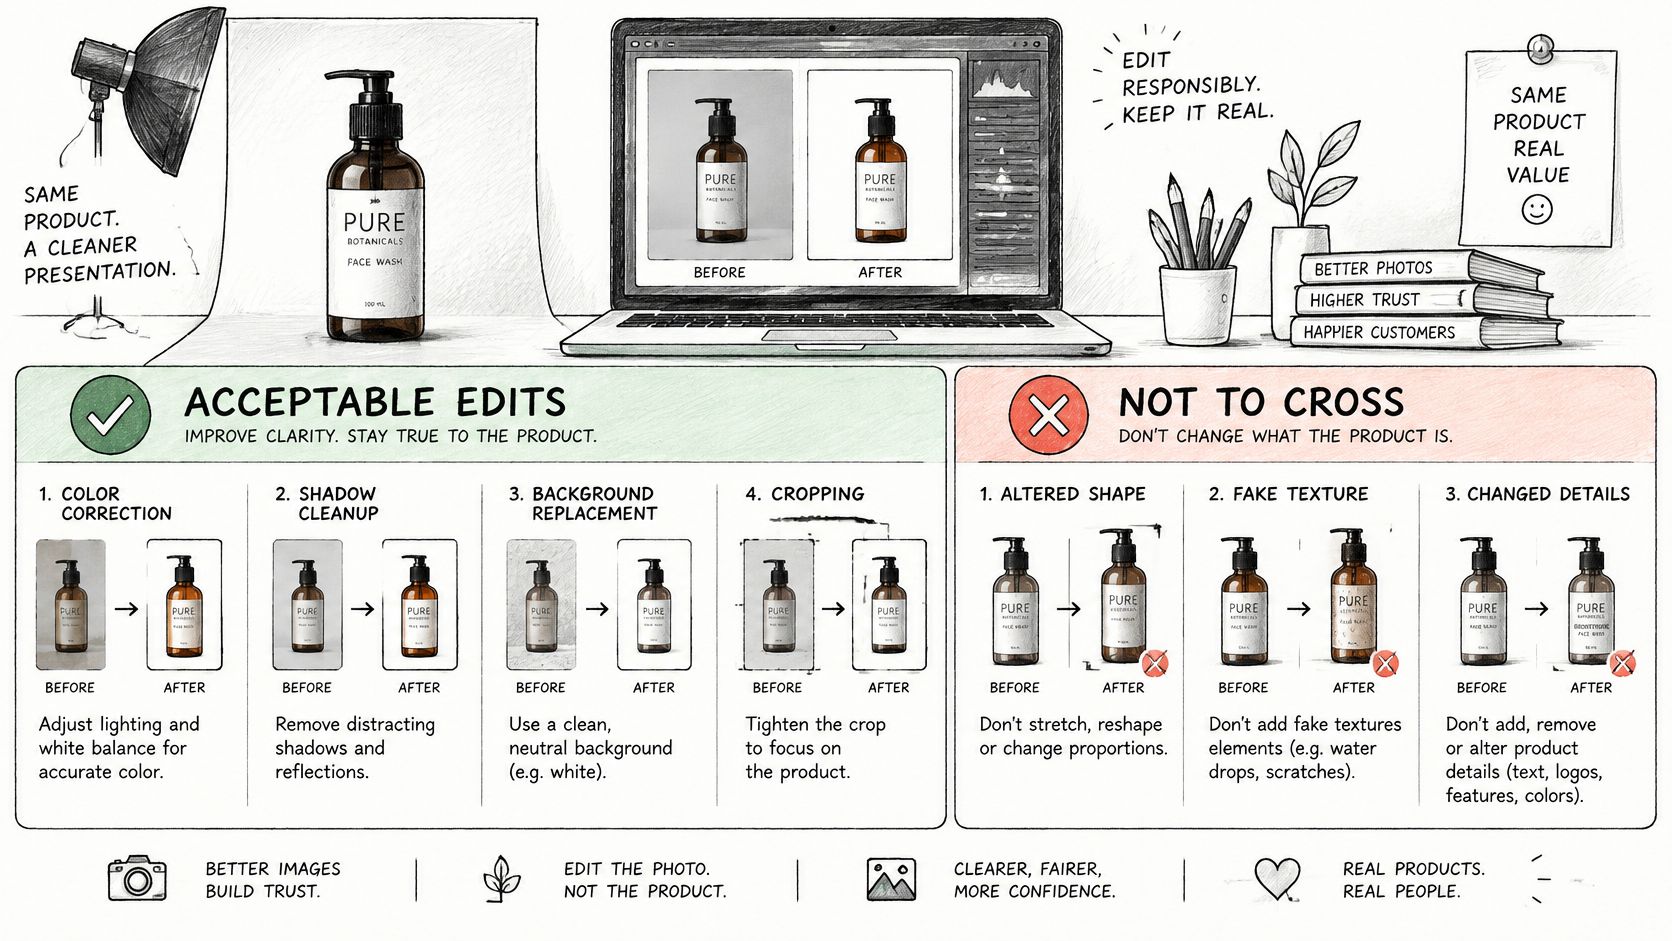
Acceptable and prohibited edits for mattress imagery
Edit | Acceptable | Prohibited |
|---|---|---|
Color correction | Matching physical fabric under standard light | Shifting ivory, navy, or gray to another color |
Shadow cleanup | Removing dust and stray marks under the base | Erasing contact cues so a staged bed appears to float |
Background replacement | Clean white or light-neutral background | Introducing surroundings that misleadingly change the perceived finish or offering |
Texture enhancement | Restrained sharpening of existing stitching and quilting | Adding patterns or construction the product lacks |
Wrinkle or cover cleanup | Smoothing a temporary packaging crease | Removing a fold that reveals genuine loft or edge construction |
Dimension and thickness | Straightening and level correction | Making the mattress thicker, taller, or wider than delivered |
Lifestyle room scene | Clearly labeled composite using the actual product | Unlabeled generated staging presented as a real photograph |
Hardware and handles | Cleaning superficial scuffs and marks | Adding, removing, or changing handles or feet |
Generated materials | Retouching the existing surface | Inventing a fabric, finish, or component |
These are production boundaries, not a claim that every stylistic choice violates a platform rule. The underlying requirement is straightforward: Google Merchant Center's image policy requires accurate representation of the exact product offered.
Make AI edits auditable
Preserve original captures, record substantial generated changes, and keep product masks separate from generated surroundings. Label substantially generated scenes so shoppers can distinguish a visualization from a photographed bedroom.
Cropping needs the same discipline. For social derivatives, the instructions to crop images in Pin Generator provide a practical tool reference, but the editor still owns the framing decision. Don't crop away the gusset or handles that distinguish the advertised model.
Place the original and edited image side by side. Ask whether a showroom associate would recognize the same mattress, including its loft, edge profile, and cover construction.
Connect that review to reducing product returns: track appearance-related questions and not-as-expected complaints alongside clicks. An attractive ad isn't a useful win if the delivered mattress contradicts it.
Tools for Mattress Product Photography Editing
Choose tools by the production problem they solve. A powerful editor won't fix a missing color reference, and an automated cutout won't tell you whether it accidentally removed white piping.
Build a small, accountable tool stack
Raw processor: Adobe Lightroom, Camera Raw, or an equivalent should handle profiles, neutral-target readings, and synchronized corrections. Save a preset per lighting setup, not a universal preset for every mattress.
Layered editor: Adobe Photoshop or a comparable application should support masks, separate cleanup layers, and editable shadows. Keep geometry corrections distinguishable from surface retouching.
Background-removal tool: Use automation for the initial mask, then inspect piping, handles, pale ticking, and the foundation edge manually.
Batch exporter: Generate named channel files from the approved master. Separate crop presets from compression presets so changing a marketplace dimension doesn't overwrite the master.
Asset register: A spreadsheet can connect the SKU, source file, approved master, colorway, approval date, and delivered derivatives.
Say a manufacturer photographs several hybrid mattresses under an unchanged lighting setup. The editor can synchronize the initial raw correction, then review each fabric independently. A charcoal gusset and an ivory quilt don't necessarily need identical local adjustments.
Evaluate integration before adding software
A tool also needs to fit the team's handoffs. When reviewing workflow integrations, freispace news on Editingtools is a useful starting point for investigating the connection between editing utilities and production planning. Verify the actual file exchange and approval requirements before adding another application.
Test prospective software on difficult assets: white piping against white background, dark knit ticking, and a handle casting a narrow shadow. Judge whether the output remains editable, not just whether the first preview looks clean.
A fast cutout that needs extensive edge repair isn't a faster workflow.
AI features belong inside the same approval process. Retouching an existing surface can be useful; generating an unapproved replacement surface is a different task.
Building an Image Set That Answers Buyer Questions
A mattress gallery should answer the questions a retail sales associate would handle beside a floor model. A beautiful bedroom scene can establish style, but it can't explain foam layers, foundation compatibility, or the shape of the edge.
Build the set around buyer uncertainty, rather than filling every image slot with another attractive angle. Prodofoto's discussion of product imagery and returns connects clearer product representation with managing expectations, a useful distinction when choosing between another lifestyle image and a missing construction view.
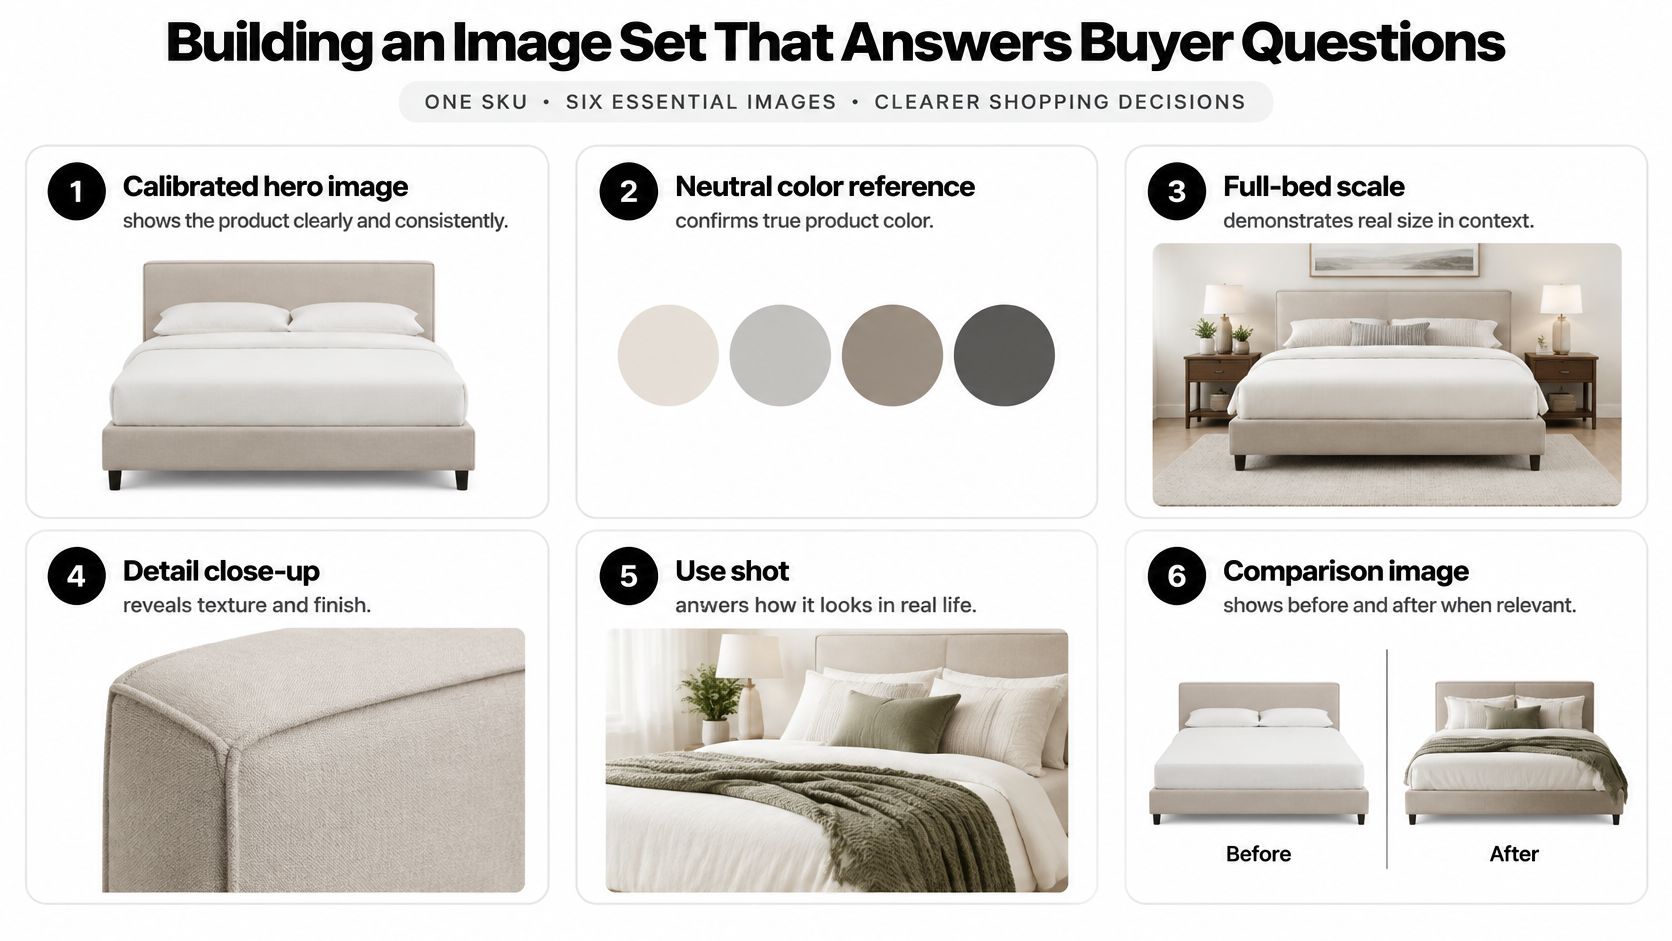
Give every image a job
Calibrated hero image: Establish the exact model and colorway without distracting styling.
Neutral color reference: Show an approved fabric region without warm room lighting influencing its appearance.
Full-bed scale view: Include a credible bedroom reference and make clear which bed size is pictured.
Detail close-ups: Reveal ticking, quilt depth, edge stitching, piping, and handle attachment.
Profile view: Show thickness and edge proportions. Don't imply that an unloaded side view proves edge-support performance.
Construction graphic: Explain the approved foam layers and support system, especially where hybrid mattresses look similar externally.
Labeled lifestyle composite: Help shoppers visualize the mattress in a bedroom without confusing staging with supplied accessories.
Aspiration belongs in the room scene. Inspection belongs in the close-ups, profile, and construction view. Keep both, but don't ask either to do the other's job.
Use customer-facing language when naming gallery assets. The questions covered in a mattress buying guide can help identify what the gallery still leaves unanswered.
Control the same SKU across channels
Create a version record containing the master file ID, approval date, approved colorway, and channel derivatives. Record whether an image includes a foundation or other accessory so a dealer doesn't accidentally advertise a bundle that isn't offered.
Consistency across touchpoints isn't unique to bedding. Wecomeet's discussion of creating consistent skincare packaging and websites offers a useful parallel for aligning visual identity, although mattress teams must also protect construction accuracy across retailer portals, marketplaces, dealer sites, and ads.
Before publication, product engineering checks the layer graphic and visible construction. Sales checks that the images match the floor model and selling explanation. Customer service flags appearance-related complaints that the revised set should resolve.
Hero Specs and Web Delivery Checks
A listing hero needs enough resolution for buyers to inspect the mattress, while remaining light enough to load efficiently. A polished retouch cannot recover detail that the original capture never contained.
Google's primary-image guidance recommends 1500 × 1500 pixels or larger, with the product occupying approximately 75% to 90% of the frame. Leave enough margin to show the full silhouette, including projecting handles and foundation corners.
Hero image specifications for product listings
Google's product image specification sets a general minimum of about 100 × 100 pixels, with a maximum file size of 16 MB and maximum resolution of 64 megapixels. The minimum is a platform threshold, not a useful production target. Prepare a 1500 × 1500 px image when possible, then inspect it at full size.
Requirement | Target | Why it matters |
|---|---|---|
Minimum size | About 100 × 100 px | General platform minimum |
Recommended size | 1500 × 1500 px or larger | Practical target for quality inspection and listing formats |
Product fill | 75% to 90% of the frame | Keeps edges and quilting easy to inspect |
Maximum file size | 16 MB | Platform limit |
Maximum resolution | 64 megapixels | Platform limit |
Accepted formats | JPEG, WebP, PNG, non-animated GIF, BMP, TIFF | Choose according to platform support and compression needs |
Background | Clean white or light-neutral | Suitable for a listing hero |
Overlays | No watermarks, promotional text, or borders | Not permitted on the listing hero |
Treat platform limits as ceilings, not production targets. A file can meet the upload limit and still be unnecessarily heavy for a mobile shopper.
Enlarging a thumbnail does not restore missing detail. Check the original capture before committing to a zoomable delivery file. Artificial outlines around stitching or invented fabric texture can make a mattress look sharper while obscuring what buyers need to judge: fabric, loft, construction, and scale.
Choose exports for the destination
JPEG is a practical photographic format when broad compatibility matters. WebP or AVIF may suit an owned commerce site if its image pipeline supports them; a website and a product feed may accept different formats.
PNG can preserve transparency or a specific edge treatment. TIFF is better suited to archival or production handoffs than a routine storefront hero. Keep the working master available, but deliver an appropriately sized derivative to the page.
Check the crop against the offer. If the lower edge of a mattress on a foundation disappears, the image may leave buyers unsure whether the foundation is included. Keep the hero focused on the item for sale, and describe pictured accessories clearly.
Reserve space and prioritize the hero
Set intrinsic width and height, or a fixed aspect ratio, for each image slot. Generate responsive derivatives so a phone does not download a desktop-sized asset unnecessarily.
Load the primary product image without lazy loading. Use lazy loading for gallery assets below the fold, while reserving their display space. The practical checks in this guide to optimizing images for the web connect export choices with page delivery.
The HTTP Archive Web Almanac performance chapter identifies 2.5 seconds as the good Largest Contentful Paint threshold and discusses unsized images as a layout-shift problem. Largest Contentful Paint measures when the largest visible content element renders. On a product page, that element may be the hero image.
Run a final acceptance test:
Inspect at full resolution. Look for edge halos, smeared ticking, and sharpening artifacts around quilting.
Compress progressively and compare each export with the approved master. Stop before stitching merges or dark fabric turns blocky.
Test at mobile width on a throttled connection. Check the initial appearance and zoom behavior, not only the desktop preview.
Confirm Largest Contentful Paint and layout stability in field measurements. A laboratory test alone cannot represent every shopper's device and connection.
Delivery check: Approve the file inside the actual product-page template, not only in the editing application.
Audit One Hero SKU Before Your Next Shoot
Choose a commercially important SKU and gather every live image tied to it, including website galleries, dealer files, marketplace listings, and active paid-ad creative.
Score each workflow stage as pass or fail. Record recurring defects and correct them in the master files before scheduling another shoot. If the original captures contain the detail buyers need, improving the editing and delivery may cost less than reshooting.
Turn the audit into a production decision
Check the offer: Confirm the model, colorway, pictured size, and included accessories.
Find missing answers: Compare the gallery with the buyer-question checklist. Check whether profile and construction views are clear.
Log expectation gaps: Connect appearance-related return reasons and customer questions to the relevant asset.
Assign approval: Name one person to release the revised set and retire outdated derivatives.
A generic bed photo can leave buyers unable to judge the product. Identify what the listing fails to show before commissioning another room scene. The ticking and gusset, for example, may need clearer representation.
BEDHEAD helps mattress brands, bedding manufacturers, and retailers grow through digital marketing, ecommerce strategy, creative asset creation, product storytelling, website design, and high-end visual content, including 3D visualization. Each visual decision should preserve what buyers need to assess: fabric, loft, construction, and size.
Visit BEDHEAD to discuss an audit of your priority SKU.