Hard Surface Modelling for Mattress Product Visualization
A marketing director can have accurate specifications, premium ticking, carefully selected quilt patterns, and a strong hybrid mattress construction, yet still face product pages that feel flat. The photography may show a mattress from one angle, fail to explain the foam layers, and require another expensive shoot whenever a gusset, fabric color, headboard, or accessory changes. Customers then make decisions with incomplete visual information, while retailers work harder to recreate the product story on the showroom floor.
Hard surface modelling provides the technical foundation for the rigid, precise parts of mattress visualization, including bed frames, headboards, metal components, platforms, legs, and bedside accessories. Combined with organic modelling for fabric, foam, and soft quilting, it allows brands to build reusable product imagery instead of treating every new SKU as a photography problem.
For teams evaluating a visualization partner, the practical question isn't whether a render looks attractive in isolation. It's whether the model accurately represents the product, adapts to future marketing needs, and supports sales across ecommerce, retail presentations, paid media, and product education. A useful starting point is this overview of 3D product visualization, especially when your current imagery varies from one SKU to the next.
Marketing teams also need to distribute the story around those visuals. An AI LinkedIn viral content generator can help turn approved product concepts into social content, but the underlying model still needs to be technically reliable before anyone promotes it.
Why Your Mattress Product Pages Need Better Visuals
A premium mattress can lose its perceived value before a shopper reaches the specifications. If the image doesn't reveal the quilt, edge profile, gusset, cover finish, or relationship between the mattress and its foundation, the customer sees a generic rectangle. That weakens differentiation and makes a higher-priced product harder to justify.
This problem appears frequently across mattress catalogs. One SKU may have studio photography, another may use a supplier image, and a third may show a lifestyle scene with inconsistent scale or lighting. The customer has to assemble the product story themselves, while the ecommerce team manages a growing collection of images that become outdated as soon as construction or styling changes.
The visual gap between the product and the page
Suppose a brand introduces a hybrid mattress with visible foam layers, reinforced edge support, and a custom ticking pattern. A conventional hero photograph can show the finished surface, but it can't naturally show the internal build without a cutaway prop, a separate technical illustration, or another production setup.
A well-built 3D asset can produce several views from the same source model:
Silhouette views: Clean product images for marketplaces, comparison pages, and catalogs.
Room scenes: Lifestyle compositions that show scale, bed height, foundations, and surrounding accessories.
Layered images: Digibuns that expose foam layers, spring systems, quilting, and support materials.
Detail views: Close-ups of stitching, panel transitions, hardware, legs, and frame finishes.
Hard surface modelling matters because a mattress campaign often includes more than the mattress itself. A bed frame with inaccurate corner geometry or soft, poorly controlled edges can make the entire scene look artificial, even if the mattress material is convincing.
The commercial case is also becoming clearer. A 2025 study on 3D visualization in ecommerce reported conversion-rate improvements of 35% to 40% for businesses investing in 3D visualization, as documented in the study on 3D visualization and ecommerce conversion. That doesn't mean every render produces the same result, but it does support treating visualization as a merchandising investment rather than decoration.
Understanding Hard Surface Modelling Fundamentals
Hard surface modelling creates controlled, manufactured forms. It's used for objects with deliberate planes, edges, thicknesses, holes, and joins. Organic modelling handles forms that behave more like fabric, foam, skin, or sculpted material, where natural variation and softer transitions matter more.
An architectural drafter works from dimensions, alignment, and repeatable geometry. A sculptor shaping clay is more concerned with volume and feel. Mattress visualization needs both approaches. The quilt and foam require soft-surface judgment, while the headboard frame, bed rails, legs, brackets, and metal supports require the discipline of hard surface work.
The field has evolved alongside computer-aided technology, moving from relatively simple workflows toward production pipelines that combine polygon modelling, NURBS, subdivision surfaces, boolean operations, parametric modelling, and procedural modelling. A major milestone arrived in 1978, when Catmull and Clark introduced subdivision surface modelling, a technique that remains foundational to modern polygon-based pipelines, as described in this history of hard surface modelling and subdivision methods.
The techniques that control the result
Boolean operations cut, intersect, or combine shapes. They're useful for recesses, mounting holes, frame connections, and panel breaks, but unmanaged boolean geometry can create shading problems.
Bevels give an edge a controlled transition. A perfectly sharp digital edge rarely catches light like a manufactured product, so a measured bevel helps metal, painted wood, and coated components read as physical materials.
Edge loops guide surface flow and help artists hold a profile under subdivision. They're especially important around corners, openings, and changes in curvature.
Subdivision surfaces refine a coarse control mesh into a smoother limit surface. The control mesh typically uses triangles and quads, with crease rules available to preserve selected sharpness.
NURBS describe mathematically controlled curves and surfaces. They're useful when a component needs predictable curvature, such as a shaped rail or a manufactured support element.
Subdivision isn't a substitute for good modelling. The base topology affects tangent-plane smoothness around extraordinary vertices and curvature smoothness across regular vertices. Artists can preserve sharper transitions with supporting loops or crease values, which control whether an edge remains smooth, partially sharp, or fully sharp. Autodesk's subdivision surface reference explains why the control cage matters so much to the final surface.
For non-technical stakeholders, the takeaway is simple. Ask whether the model can hold a clean silhouette, whether close-up reflections behave consistently, and whether the artist can explain how sharp edges and transitions are being managed. A deeper introduction to the subject is available in what a 3D model is.
Practical rule: If the frame looks correct only from one camera angle, the modelling process hasn't solved the product. It has solved a screenshot.
The Complete Production Workflow
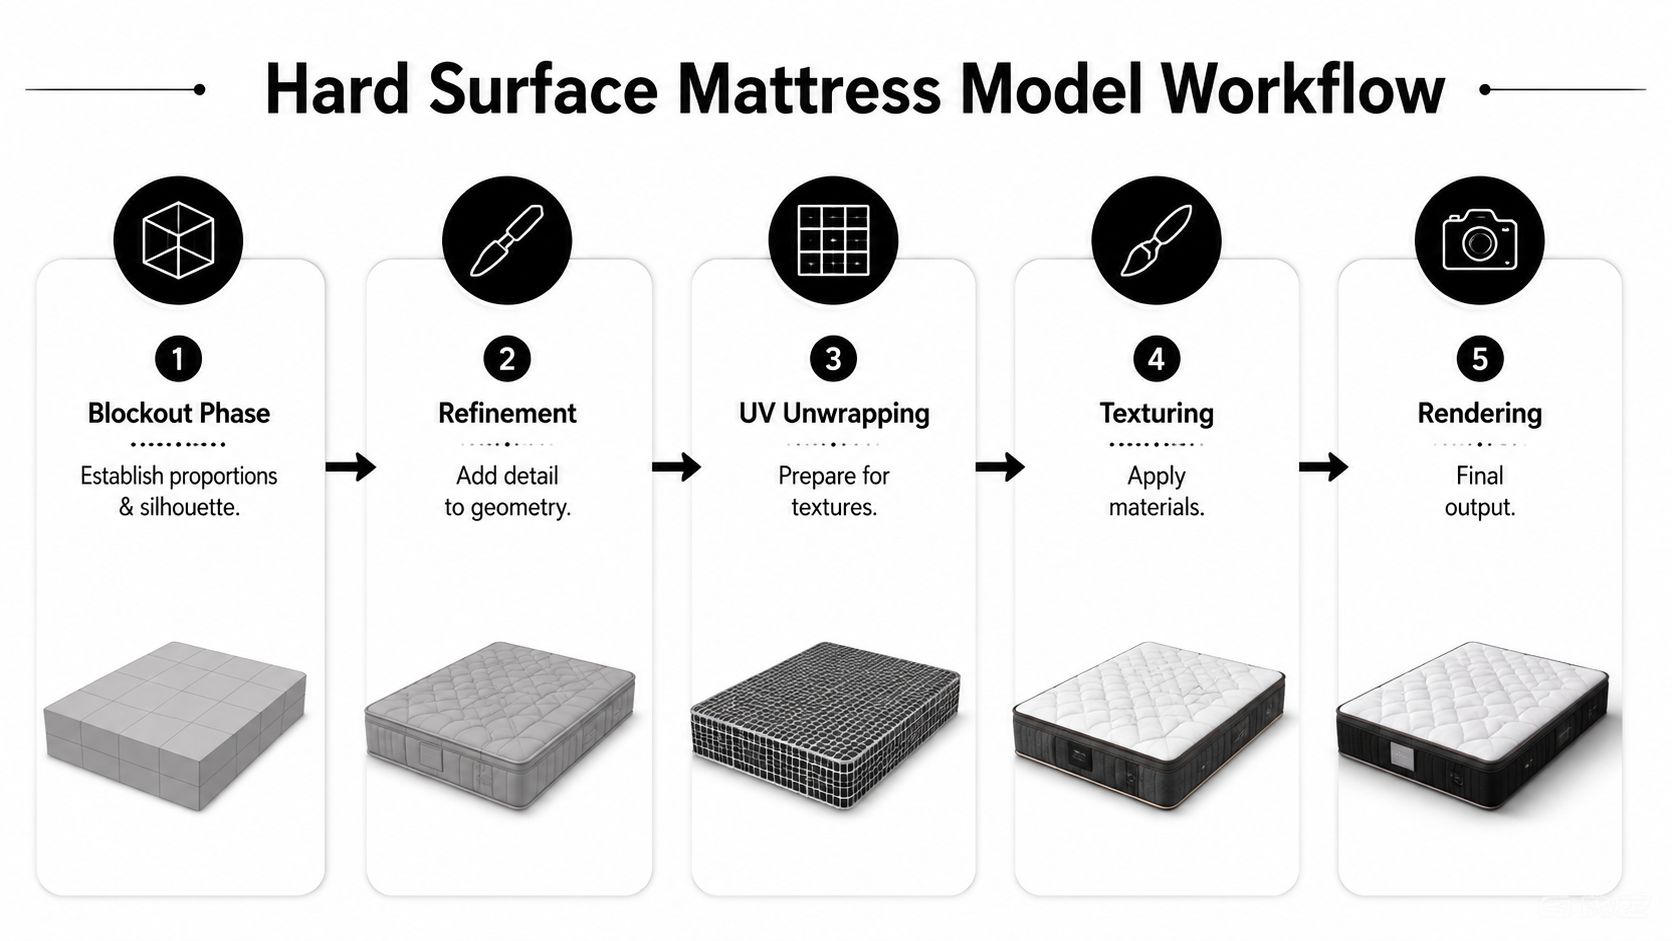
A reliable hard surface asset starts with proportion, not detail. The artist blocks the frame, headboard, base, or accessory with simple primitives, then checks its overall height, width, depth, silhouette, and relationship to the mattress.
That first stage is where client feedback has the highest value. If the headboard is too tall or the platform is too deep, correcting the blockout is straightforward. Correcting the same issue after hardware, materials, UVs, and lighting have been developed creates unnecessary rework.
Where the production decisions happen
Reference review: Gather dimensioned drawings, product photographs, material samples, CAD files, and approved brand references.
Blockout: Establish proportions and silhouette with low-complexity geometry.
Client approval: Confirm the form before investing in detail.
High-poly detailing: Add bevels, joints, recesses, seams, brackets, and other visible construction features.
Topology cleanup: Remove unnecessary geometry and correct intersections that could affect shading.
Retopology: Build efficient, clean geometry for rendering, revisions, animation, or future reuse.
UV unwrapping: Lay out surfaces so textures and material maps can be applied without stretching.
Material preparation: Define separate behavior for brushed metal, polished chrome, painted wood, plastic, foam, and ticking.
Baking: Transfer selected high-poly detail into maps used by the optimized model.
Scene assembly: Position the mattress, frame, foundation, bedding, and room elements.
Lighting and rendering: Use light to reveal edge quality, surface roughness, fabric response, and construction.
Output delivery: Export approved views and, where agreed, reusable files for future campaigns.
Not every project needs every step at the same level. A static product page may need a polished render and a silhouette, while an interactive configurator or animation requires more disciplined topology and file organization.
Materials and feedback
Material choices change the modelling priorities. Brushed metal needs controlled reflections, polished chrome exposes every shading error, and painted wood requires believable edge behavior without looking artificially rounded. Mattress fabrics introduce a different challenge, because the ticking, quilt, and gusset need texture scale and softness that complement the harder surrounding geometry.
The most expensive feedback usually arrives after the model has moved beyond blockout. Confirm dimensions, component relationships, visible seams, finish options, camera requirements, and intended placements early. The process of rendering provides useful context for how modelling decisions affect the final image.
A render is only as reusable as the decisions made before the first final frame.
Choosing the Right Software and Tools
There isn't one correct application for every mattress visualization project. A studio may use CAD software for manufacturing references, Blender or 3ds Max for asset development, and a dedicated renderer or compositing tool for final delivery. The artist's judgement, topology discipline, reference handling, and revision process usually matter more than the logo on the software license.
Software | Cost | Learning curve | Best for | Industry use |
|---|---|---|---|---|
Blender | Free to use | Steep for advanced hard surface work | Flexible modelling, rendering, and procedural workflows | Product visualization, animation, general 3D |
3ds Max | Commercial | Significant | Architectural and product visualization with an extensive plugin ecosystem | Visualization studios and design pipelines |
Maya | Commercial | Significant | Complex modelling combined with animation and production workflows | Animation, VFX, and broader 3D production |
Cinema 4D | Commercial | Generally approachable | Motion graphics, product animation, and quick scene development | Motion design and visual content |
Fusion 360 | Commercial options available | Technical | Parametric and manufacturing-oriented design | Product development and engineering |
SolidWorks | Commercial | Technical | Dimensionally controlled mechanical and manufacturing models | Engineering and manufacturing |
What the mattress team should evaluate
Blender can be a capable choice for a studio that needs flexibility and control, but advanced workflows require trained artists. 3ds Max remains useful where architectural scenes, established production systems, or specialist plugins are important. Maya makes more sense when animation and complex production requirements sit beside visualization. Cinema 4D is often attractive for motion-led campaigns and product explainers.
Fusion 360 and SolidWorks are valuable when the source needs to reflect manufacturing intent. They can preserve dimensions and relationships that a purely visual model may simplify. A CAD model still needs preparation before it becomes a polished marketing asset, because engineering accuracy and visual communication solve different problems.
Blender plugins such as HardOps and BoxCutter can speed boolean and bevel workflows, while cleanup tools can help artists manage the geometry those operations create. Tools also need to support the destination. If a brand wants to repurpose assets for social video, a guide on how to optimize 3D models for TikTok can be useful, but the model must first be structured for efficient export and animation.
Ask a prospective partner:
File ownership: Will you receive reusable source files or only flattened images?
Format support: Can the team deliver the formats your website, retailer, AR, or animation workflow requires?
Revision method: Do they seek approval at blockout before detailed production?
Material accuracy: Can they reproduce ticking, quilt, brushed metal, painted wood, and foam convincingly?
Asset reuse: Can one approved model produce Digibuns, silhouettes, room scenes, detail views, and video outputs?
The software landscape for CGI matters, but a clear production system matters more.
Real-World Applications in the Mattress Industry
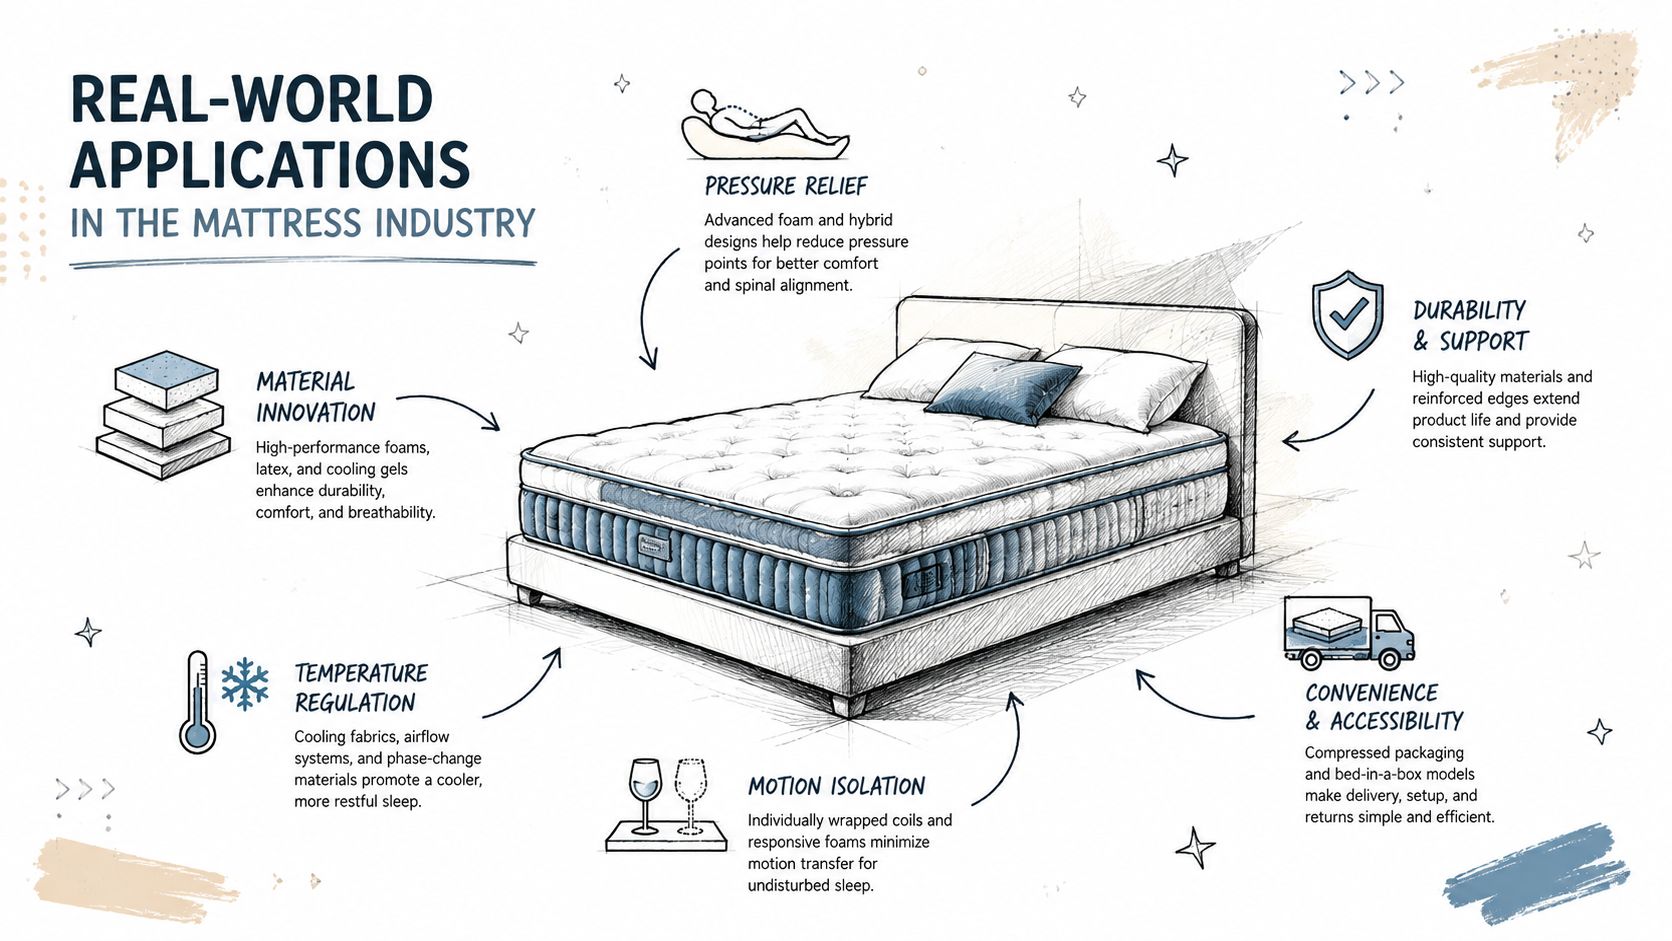
A mattress rarely sells on the mattress image alone. The shopper may also need to understand the foundation, bed frame, headboard, legs, hardware, bedding, and room proportions. Hard surface modelling gives those supporting elements enough precision to make the complete product presentation credible.
Consider a platform bed with metal rails and wooden slats. A weak image may hide the connection points and make the frame appear generic. A precise model can show the rail profile, corner construction, leg placement, finish, and relationship to the mattress height. That helps ecommerce shoppers understand what they're buying and gives showroom teams a clearer story for floor models.
From frame details to complete room scenes
Headboards benefit from the same approach. The upholstered surface may require organic techniques for padding, tufting, and soft fabric response, while the internal frame, trim, mounting points, and rear structure need controlled hard surface geometry. The result should show the intended proportions without turning the headboard into a vague fabric shape.
Accessories complete the visual context:
Nightstands: Show scale, finish, drawer alignment, and how the mattress height relates to surrounding furniture.
Lamps: Provide believable proportion and material contrast in room scenes.
Bed bases: Clarify support height, leg design, and the finished profile.
Decorative elements: Create a controlled lifestyle setting without relying on a location shoot for every campaign.
Showing what customers can't see
A Digibun or exploded view can separate the mattress cover, quilt, comfort foams, support core, springs, and edge support so the shopper understands construction. Hard surface methods become especially useful for rigid components inside the build, such as support rails, encasements, clips, and platform structures. The soft layers still need accurate material behaviour, but the rigid parts must align cleanly and communicate assembly.
One model can also support color and finish variations without photographing every SKU. A brand can update a fabric, leg finish, headboard detail, or room setting without rebuilding the entire campaign from scratch. That flexibility supports faster launches and more consistent product pages, while clearer visualization can help customers make better-informed choices and reduce the mismatch between expectation and delivery.
For teams managing frequent product changes, a furniture product lifecycle PLM guide offers useful context on how product information and visual assets can fit into a broader lifecycle process. The marketing asset shouldn't become an isolated file that no one can update.
In the mattress category, visualization also supports education. The global mattress market was estimated at USD 49.24 billion in 2025 and is projected to reach USD 83.36 billion by 2033, with a projected CAGR of 6.9% from 2026 to 2033, according to Grand View Research's mattress market forecast. As the category grows, brands need imagery that explains construction clearly across manufacturers, retailers, private label programs, and sleep product startups.
Common Pitfalls and How to Avoid Them
The assumption that more polygons automatically produce a better model causes avoidable problems. Dense geometry can hide weak proportions, slow revisions, and still produce poor shading if the topology and normals are unmanaged.
A hard surface model can have the correct silhouette and still look wrong under light. Sharp creases need separate normals on each side rather than shared vertex normals, and poor normal management can create visible artifacts along otherwise accurate edges. The practical relationship between topology, crease settings, and shading is explained in this hard surface topology reference.
The errors that create downstream cost
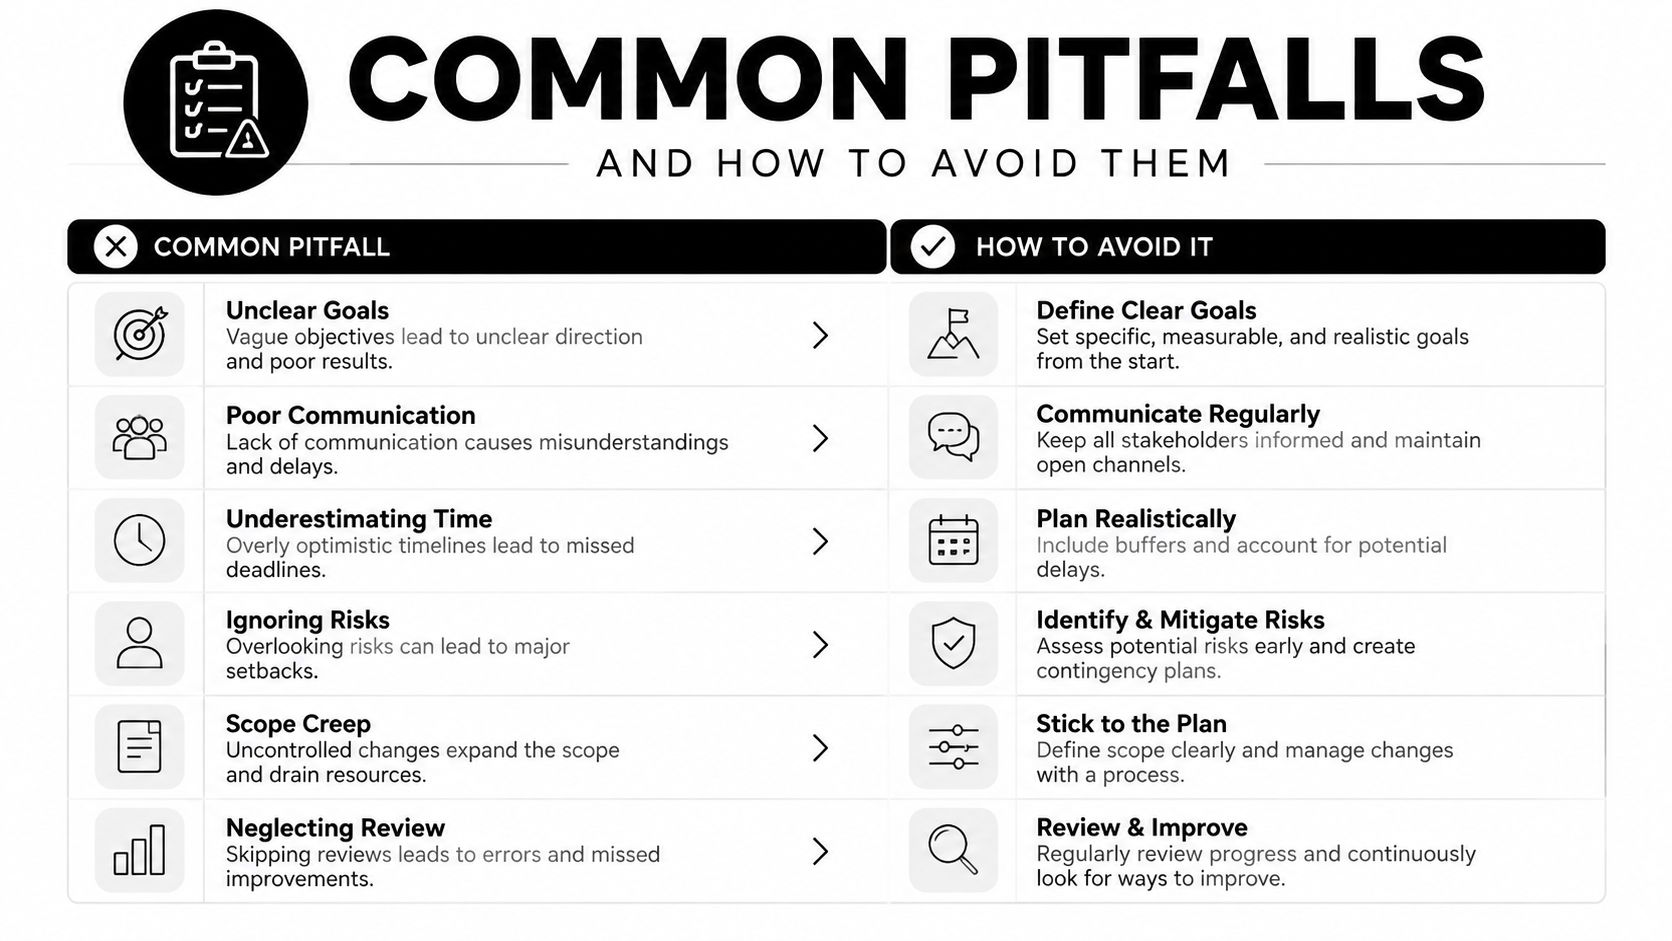
Detail before proportion: Artists add bolts, seams, bevels, and materials before the mattress-to-frame relationship is approved. Require a blockout review first.
Unmanaged booleans: Boolean cuts leave awkward intersections or stretched faces. Keep the operation editable where possible, then clean the areas that affect reflections and close-up views.
Weak normals: A hard edge appears soft, or a flat plane shades unevenly. Review the model under moving lights rather than trusting a single camera.
Scale errors: Incorrect dimensions create trouble when the asset moves into manufacturing references, AR, animation, or room planning. Use supplied measurements and maintain a consistent scene scale.
Poor naming: Components named “final2” or “newframe” slow every revision. Name mattresses, rails, legs, slats, fabrics, and hardware so other team members can locate and replace them.
Hidden surface defects: Sliver faces, near-tangencies, and imperfect curvature can cause failures in offset, shell, thicken, and sweep operations. Surface validation belongs in production, not only in engineering review.
Use a review checklist before approving final renders:
Silhouette: Does the outline match the approved product?
Edge behaviour: Are bevels consistent across frame, headboard, and hardware?
Shading: Do reflections travel smoothly across intended surfaces?
Texture scale: Does the ticking, wood grain, or brushed finish remain believable?
Lighting: Does the setup reveal construction rather than hide it?
File structure: Can another artist update a color, component, or camera without rebuilding the scene?
A polished image can conceal a fragile file. Ask to review both the final output and the production logic behind it.
Taking Action on Your Visualization Strategy
Start with an audit of the assets that carry the most commercial weight. Look at hero mattresses, new launches, premium hybrid models, and products sold through ecommerce channels. Check whether the imagery shows realistic ticking and quilt detail, accurate headboard proportions, convincing frame materials, useful color variations, and enough information about foam layers or internal support.
3D visualization makes the most sense when a product has many variants, changes frequently, needs several camera angles, or must appear in room scenes, retailer presentations, paid ads, and product pages. Traditional photography still has a place, especially when a physical texture or showroom environment is central to the message. The decision should follow the content system, not a blanket preference for one medium.
A practical starting point
Choose a hero product or upcoming launch and define the required outputs before production begins:
Commerce: Main image, side view, detail view, and variation images.
Education: Digibun, cutaway, or exploded construction graphic.
Retail: Room scene, presentation slide, and product activation visual.
Campaigns: Social crops, paid media assets, and short motion outputs.
Approve the blockout before the artist develops detailed geometry. Confirm measurements, materials, camera angles, file formats, revision ownership, and how the asset will be reused. Then compare the finished visualization against product page engagement and conversion data already available in your analytics. The 3D visualization study cited earlier reported 35% to 40% conversion-rate improvements for investing businesses, but your own product, traffic, pricing, and merchandising conditions will determine the outcome.
Bedhead Marketing works specifically with mattress manufacturers, brick-and-mortar and ecommerce retailers, private label brands, and sleep product startups. Its services include photorealistic 3D modelling, Digibuns, silhouettes, room scenes, SEO, Google and Meta paid media, product page optimization, brand and USP development, presentation decks, and mattress retail sales training. The team also provides Bedhead University education for professionals who need stronger product and marketing knowledge.
Audit one product family, identify the visual gaps affecting customer understanding, and ask potential partners to show how their hard surface modelling workflow will address them. That approach keeps the investment tied to usable assets and measurable commercial priorities.
If your mattress imagery needs more accurate frames, headboards, room scenes, silhouettes, or Digibuns, BEDHEAD can develop the 3D assets and product-page strategy together. Visit Bedhead to discuss a focused visualization project for a launch, hero SKU, or broader bedding catalog.